What Is a Dieline?
A Dieline is a technical template used in the packaging and printing industry that represents the layout and design of a physical package. It is a two-dimensional diagram, often created using specialized software, that shows where the package should be cut, folded and scored to create the desired final shape and functionality.
A die line is a packaging template that ensures a proper layout for a printed product. It is a diagram that shows all the cut lines and rolls and inserts of a package in flattened form.
Dielines are essential in ensuring that the packaging design is accurate and efficient before it goes into production, and are used as a guide for creating the dies, molds, or cutting templates used in the manufacturing process.
Who Creates the Dieline?
Dielines are the skilled template usually created by the packaging designers, they also work closely with engineers, production specialists, and other team members to ensure that the packaging design is accurate and efficient before it goes into production.
Dielines are not limited to just tin boxes, they are used in a wide variety of packaging such as simple folders with pockets to complex and intricate designs. With Dielines, the possibilities are endless, providing the framework for the final product to be shaped and molded into the desired outcome.
Types of Lines in the Dieline.
In a dieline, there are several types of lines that are used to indicate different instructions for cutting, folding, and scoring the packaging. The most common types of lines include:
- Cut lines: These are the lines that indicate where the package should be cut in order to create the desired shape and size. They are typically represented by solid lines.
- Score lines: These lines indicate where the package should be scored, which helps to create a clean and precise fold. They are typically represented by dotted lines.
- Fold lines: These lines indicate where the package should be folded. They are typically represented by dashed lines.
- Perforation lines: These lines indicate where the package should be perforated, which allows it to be easily opened or separated.
- Glue or tape lines: These lines indicate where glue or tape should be applied to hold the package together.
- Notch lines: These lines indicate where small cuts or notches should be made to aid in the folding or assembly of the package.
These lines and their representation may vary depending on the software or the designer’s preference, but their meaning remains the same.
How To Make a Dieline?
Bringing your unique packaging idea to life can be an exciting and creative endeavor, and creating your own dieline is the first step towards making it a reality. If you’re new to the process, it may seem daunting, but with the right tools and a bit of determination, you’ll be able to create a dieline that accurately represents your vision.
One great way to get started is by finding a box or package that closely resembles the one you want to create, and then carefully measuring and studying its design. You can even send an example of your desired final packaging to the printing company, so they have a clear understanding of what you’re looking for.
When it comes to designing your dieline, there are many powerful tools available, such as Adobe Illustrator. Whether you’re a seasoned graphic designer or new to the process, these tools make it easy to create a professional-grade dieline that will guide the printing company in creating your final packaging. With the right tools and a bit of patience, you’ll be able to create a beautiful and functional packaging design that perfectly represents your vision.
How To Set Up Artwork On a Dieline?
1. Choosing A Dieline
Choosing a die line that matches and compliments the product it will hold is the first step to a successful package design. At Tinshine, we have over 2000+ existing tin box molds to choose from. Whether you are working in confectionaries or beauty, and fragrances we are guaranteed to have a tin mold that fits your product.
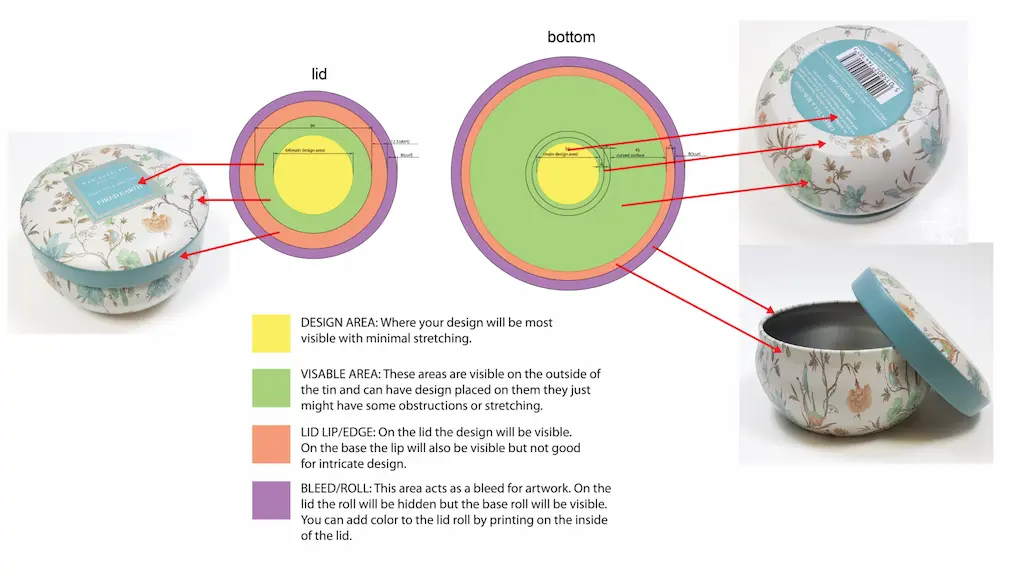
2. Understanding How To Read The die line Properly
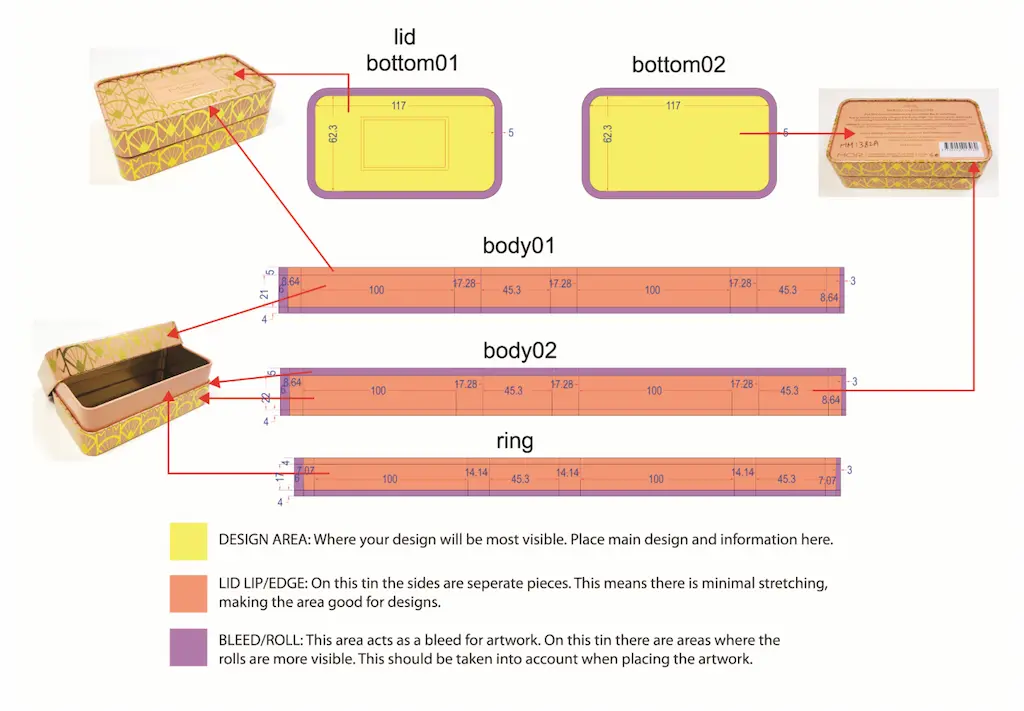
When reading a die line, it is important to have a solid understanding of the mechanics and components of the packaging mold. The language used in die lines, including terms like rolls, seams, and bleeds, can be complex, but with proper knowledge, it can be easily understood. A die line can range from a simple, straightforward design to a more intricate and detailed creation, with various pieces and seams to be considered. To gain a deeper understanding of die lines, here are 2 die line case studies to give further understanding to the die line.
Dieline Case Study 1

Dieline Case Study 2
3. Labeling And Layering Artwork
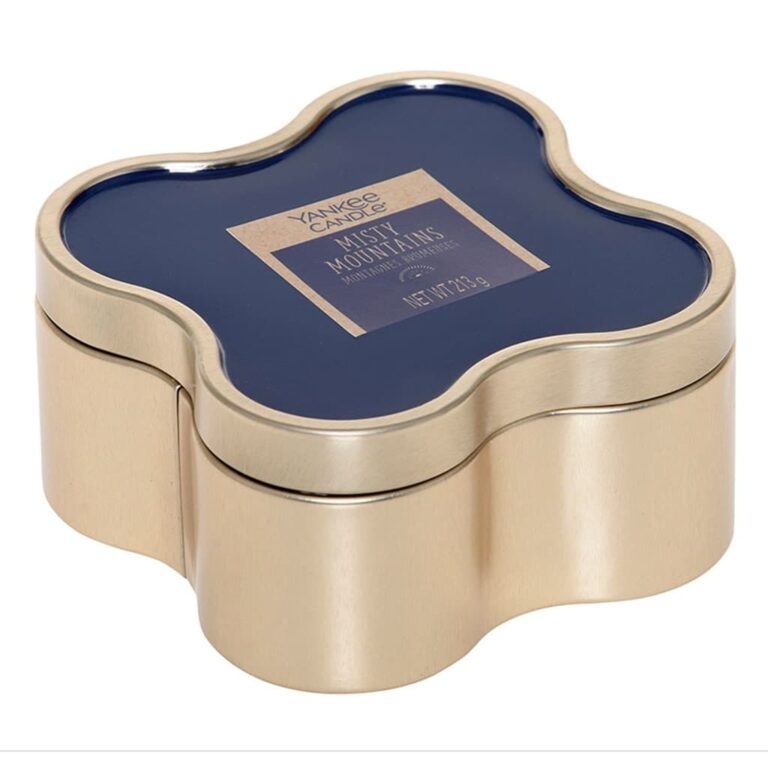
Setting up the Artwork files for the factory is also a very important aspect of making sure your finished product is exactly how you picture it. Making sure the printing instructions and layers in Illustrator are correct and organized makes the printing process quick and easy. Next, we will look at this tin and how to set up the artwork for it.
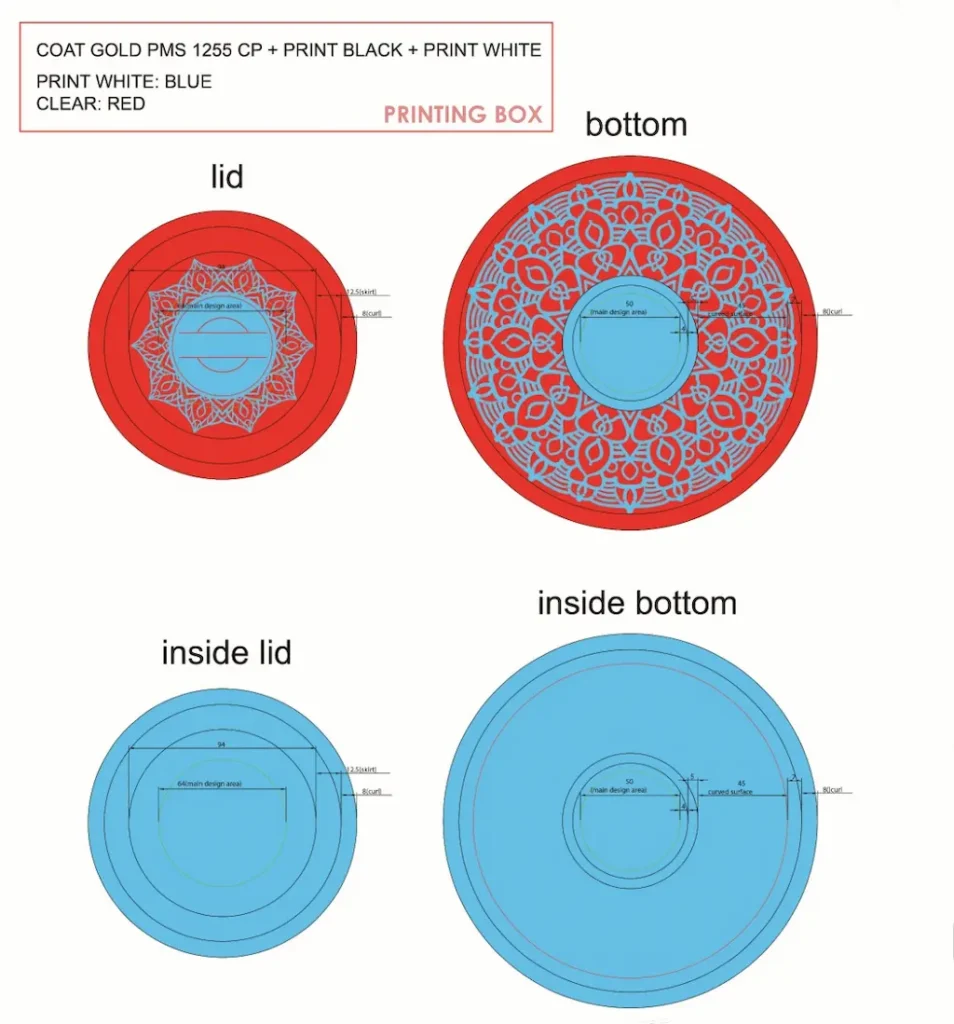
In any artwork, it is essential to include a print box containing detailed instructions for the production of the tin. This box serves as a guide for the tin factory, outlining the specific color method to be used in printing. For instance, if a design calls for a particular Pantone color, plus black and white, it should be specified in the print box. In other cases, a CMYK method may be more appropriate. It is also important to note that the cost of using multiple Pantones may be the same as using a CMYK method. This information should be clearly communicated in the print box to ensure accurate and consistent printing of the final product.

When creating artwork for a tin product, it is important to consider the desired visual effect of the raw tin. The artwork file should clearly indicate which areas should showcase the raw tin’s natural shine, and which should be solid print. This is typically achieved by using blue to indicate solid print and red to indicate areas where the raw tin will be visible. To ensure proper execution, it is essential to use the appropriate labeling. For designs where the raw tin will be visible, the label “Print White” should be used, while designs, where the raw tin will not be visible, should be labeled “Coat White.” This will ensure that the final product is exactly as you envision it.
Finally, Your artwork can have four to five layers:
- The first layer is the die-line. This layer cannot be changed. The only thing to add is the printing box and instructions.
- The next layer is the artwork. Here is where you place all the artwork, anything that you want visible on the tin. This includes UPC codes and any food or safety information.
- The third layer is the white/clear layer. Here is where you distinguish where you want the tin to show through or if you want it completely coated white.
- The fourth layer has to do with gloss and matte finishes. This layer is set up similarly to the white/clear layer only gloss is yellow and matte is purple. All tins have a glossy finish. If you want to print matte you specify it here.
- The fifth layer not shown here would have any designs that would be embossed or debossed.
Using Adobe Illustrator to Create Dielines
When working with die lines in Adobe Illustrator, it is important to set up the artwork correctly to ensure the final product is produced accurately. Regardless of the software used to create the initial artwork, you can import the file into Illustrator by saving it as a flattened PDF.
From there, it is important to set the document color mode to CMYK. By going to File > Document > Color Mode > CMYK, you will ensure that the final printed product will match the colors on your screen.
If you want to use a spot color, such as Pantone, you can access the swatch library by going to Window > Swatch Libraries > Color Books > Pantone+Solid Coated. Select the desired color and add it to your swatches, then rename it accordingly, for example, “Full Cut” or “Fold”. This process may sound technical but it is important for ensuring that your final product is exactly as you envision it.
Why You Can’t Use Adobe Photoshop to Create Dielines?
When creating die lines, it is essential to use vector art, as it is a format that is easily understood by computers and printers, and can be resized without any loss of quality. Vector art is created using mathematical calculations, which allows for greater precision and flexibility in the design process. Adobe Photoshop, while a powerful design tool, is not suitable for creating die lines as it does not produce vector art.
When working on die lines, it’s important to keep in mind the importance of precision and accuracy. Knowing the exact size of the final product is crucial for creating the design in Illustrator or InDesign. And it may be beneficial to print a hard copy of the design, to double-check for any errors before it goes into production. By paying close attention to these key details, you can ensure that the final product is exactly as you envision it.
What Does Dielines Show?
Die lines are an essential tool for creating packaging designs, not only for indicating perforation, cutting, and folding marks on flat packaging, but also for placing logos, graphics, and text on the finished product. A simple way to understand die lines is to take an empty cereal box, unfold it flat on the table and you’ll see the markings that show how the box should be folded together, the tabs that should be glued, and how the top tabs work to keep the product fresh.
Die lines serve two main purposes, firstly they allow you to lay out the various marketing elements of your packaging in a way that makes it clear as to what goes where, and how the different elements play off of each other. This means that you can see if having the logo near certain graphics is too overwhelming, or if you need to add more or less text.
Secondly, die lines also help to avoid manufacturing problems by providing the printer with a blueprint to work from, ensuring that the final product meets your exact specifications. They provide an aesthetic outline and at the same time, it helps to avoid any problems during production.
Taking the Next Steps
Die lines play a vital role in the packaging process, as they provide the blueprint for the final product, ensuring that the package looks attractive and uniform. Without die lines, it would be difficult to achieve the desired outcome.
Having a team of experts that understand packaging, marketing, design, and printing, can be extremely beneficial during the process. They can provide valuable insights and suggestions that can improve the final outcome.
It’s always wise to have multiple eyes reviewing the die lines to catch any mistakes or errors before it’s too late. This will save time and resources, and help to avoid starting the process from scratch. In conclusion, creating die lines is a critical step in the packaging process, and having the right team in place can make all the difference in ensuring that the final product meets your expectations.
Need a Hand Making Your Dieline?
Creating die lines can be a task, but with the right support and resources, it can be a seamless process. Tinshine understands the complexities of creating die lines and is dedicated to making the process as easy and stress-free as possible.
We offer a dieline request form, where you can request for a custom-made dieline for free. Our team of experts has the experience, knowledge, and tools to help bring your idea from concept to completion. We utilize the latest technology in tin packaging and printing to ensure that the final product is flawless and meets your expectations.
Don’t let the process of creating die lines overwhelm you, let Tinshine guide you through the process with our expertise and state-of-the-art technology. Trust us to help bring your ideas to life.